Vim memo
Personally, I don’t mind using SublimeText, which is my editor of choice for a while. But I’m also curious about commandline editors since many people taut their ability to code over the network. You could forward X or remote in using some other way and still use Sublime, but let’s see how if goes.
I started working on this Vim setup when I got a new MBP recently. Figured, I can try something new. So, this post is more of a personal memo written by a total newbie, which is what blogs are all about. caveat emptor. In general though, the configuration is mostly inspired by yuroyoro-san’s blog post from a couple years ago.
various non-vim things
dotfiles
The setup described in this post is checked into eed3si9n/dotfiles. It is encouraged to fork other’s dotfiles, but I wanted to understand what settings I’m bringing in, so I wrote mine from scratch.
The general idea of the dotfiles is that it will be checked out to ~/dotfiles/, and contains files like zshrc. These root-level configuration files are then symbolically linked under the home directory as ~/.zshrc.
Terminal.app
I haven’t had a need to use iTerm2 on Mac. Maybe Terminal.app had some limitations in the past, but it seems ok. Another reason to stick to Terminal.app is that I’m a fan of TotalTerminal.
homebrew
Homebrew has been great.
Zsh
The shell for this machine will be Zsh. For Mac, see How to use Homebrew Zsh Instead of Max OS X Default.
$ brew install zsh
$ chsh -s /usr/local/bin/zsh
In terms of configuration, zshrc is used just to load other zshrc.* files:
## basic
[ -f $HOME/dotfiles/zshrc.basic ] && source $HOME/dotfiles/zshrc.basic

## aliases
[ -f $HOME/dotfiles/zshrc.alias ] && source $HOME/dotfiles/zshrc.alias

case "${OSTYPE}" in
# MacOSX
darwin*)
  [ -f $HOME/dotfiles/zshrc.osx ] && source $HOME/dotfiles/zshrc.osx
  ;;
# Linux
linux*)
  [ -f $HOME/dotfiles/zshrc.linux ] && source $HOME/dotfiles/zshrc.linux
  ;;
esac

## color
[ -f $HOME/dotfiles/zshrc.color ] && source $HOME/dotfiles/zshrc.color
zshrc.basic
One of the reasons to use Zsh is for better tab completion, so we can enable that here. I’m also making the prompt look like that of Bash.
## auto comp
autoload -U compinit
compinit

## prompts
PROMPT="[%m:%~]$ "

## vi bindings
bindkey -v

## history related
HISTFILE=$HOME/.zsh_history
HISTSIZE=10000
SAVEHIST=10000
setopt hist_ignore_dups
setopt share_history

autoload history-search-end
zle -N history-beginning-search-backward-end history-search-end
zle -N history-beginning-search-forward-end history-search-end
bindkey '^r' history-beginning-search-backward-end
bindkey '^f' history-beginning-search-forward-end
The hello world example of tab completion is listing out the options for ls:
$ ls -[tab]
-1                  -- single column output
-A                  -- list all except . and ..
-C                  -- list entries in columns sorted vertically
-H                  -- follow symlinks on the command line
-L                  -- list referenced file for sym link
....
Pretty cool. Another interesting feature is that it’s able to share the history across multiple sessions and run a search through it. So suppose you ran some one-liner git command, and after a bunch of other commands you wanted to rerun the git command.
$ git[Ctrl-R]
Zsh will display the last entry in the history starting with the string git.
There are tons of other things you can configure in Zsh, like more standard defining aliases for ll type of things.
Before we move on, I’m going to mention that a lot command line tool configuration is about figuring out what keyboard bindings to use. We have basically a finite amount of reasonable keyboard shortcuts, yet seemingly endless number of features coming from all ends. For Zsh, running bindkey command without arguments display the currently bound keys:
$ bindkey
"^A"-"^C" self-insert
"^D" list-choices
"^E"-"^F" self-insert
"^G" list-expand
"^H" vi-backward-delete-char
....
tmux
tmux is a terminal multiplexer. See further explanation from Zanshin.net’s My Tmux Configuration and thoughtbot.com’s A tmux Crash Course:
It allows you to have multiple virtual consoles open in a single terminal window. Moreover, you can detatch and attach to a tmux session without ending it, allowing you great flexibility when working on remote servers or machines. In many respects it is just like GNU Screen, but is distributed under a BSD license.
On Mac you should be able to grab it from Homebrew:
$ brew install tmux
To start a session, run tmux from the shell:
$ tmux new -s <session-name>
I’m using Ctrl-T as the prefix to start tmux commands. In tmux terminology, window is basically a tab, and pane is like a split screen.
Ctrl-T ccreates a new windowCtrl-T qdeletes the current paneCtrl-T " "moves to the next windowCtrl-T ssplits window horizontallyCtrl-T vsplits window verticallyCtrl-T ,renames the current windowCtrl-T $renames the current sessionCtrl-T ddetaches from the current sessionCtrl-T (h|j|k|l)moves to the pane in the directionCtrl-T Ctrl-Tmoves to the next paneCtrl-T (1..9)moves to the windowCtrl-T .renumbers the current windowCtrl-T }swaps the current paneCtrl-T Ctrl-arrowmoves the current window in the direction
# map vi movement keys as pane movement keys
bind h select-pane -L
bind j select-pane -D
bind k select-pane -U
bind l select-pane -R
We will also bind arrow keys with modifier later.
Powerline
Next, I’m adding a cool statusline using Powerline. This requires Python, so install it.
$ brew install python
This installs Python 2.7.6. Even thought the documentation says install powerline with --user, on Mac doing so results to and error, so install it without --user:
$ pip install git+git://github.com/Lokaltog/powerline
Downloading/unpacking git+git://github.com/Lokaltog/powerline
....
To point to the packages define SITE_PACKAGES environment variable in zshrc.osx:
export SITE_PACKAGES=/usr/local/lib/python2.7/site-packages/
Now we can add the following line to tmux.conf:
source $SITE_PACKAGES/powerline/bindings/tmux/powerline.conf

One cool thing about a tmux session is that it keep running in the background even if your terminal is no longer connected. So you can use Ctrl-T $ to rename the current session, and then do the following to disconnect, list the sessions, and attach back.
$ tmux detach
$ tmux ls
$ tmux a -t vim-memo
To get more info about tmux, see tmux cheatsheet.
Vim
Vim is a text editor. On Mac you can grab Vim using homebrew. For a plugin we would need Lua support:
$ brew install vim --with-lua
There are a lot of key bindings to go through around Vim. It doesn’t help that I’m adding plugins because I then would need to remember the key bindings I’m setting for them as well.
plain vim things
There are some nice resoure for learning vim
I’ve only read a few chapters of Practical Vim, but it already changed my thinking on Vim. Coming from other editors, it’s easy to think of Insert mode as the main mode, and the rest of the modes are there for other operations. On the contrary, vim’s resting state is Normal mode. The analogy used by Drew Neil is that a painter does not rest with a brush on the canvas. This applies true to programming activities like navigating through code and pondering about it.
The fact that Normal mode is the resting state gives equal keyboard opportunities to searching and moving. It also lets us think about the act of inserting a text in a chunked way. In a vim way, the act of typing something into a buffer is going to Insert mode => type something => coming back to Normal mode. This mini-program is automatically stored inside vim that can be recalled using “.”. Similarly, search within the current line can be repeated using “;”.
val foo = "method("+arg1+","+arg2+")"
Given a line of code like the above, Tip3 explains that we can search for “+” using f+, overwrite it with “+” using s + Esc, and then repeating the process by typing ;. three times.
navigating between the windows
I can’t list out all the feature included in Vim, but one of more helpful things to know is :help command. You can pass an argument like :help window to find all about windows. Because of plugins and just for programming in general, we’d need to deal with split windows, which I was not familiar with. Similar to tmux, there’s a prefix and a subcommand that follows it:
Ctrl-W ssplits the current window horizontallyCtrl-W vsplits the current window verticallyCtrl-W q(or:q) closes the current windowCtrl-W (h|j|k|l)changes the focus to the window in the directionCtrl-W (arrow)changes the focus to the window in the direction
vimrc
Similar to zshrc, vimrc is split into multiple scripts for better organization.
" basics
source $HOME/dotfiles/vimrc.basic

" extra
source $HOME/dotfiles/vimrc.extra

" indentation
source $HOME/dotfiles/vimrc.indent

" moving
source $HOME/dotfiles/vimrc.moving

" searching
source $HOME/dotfiles/vimrc.search

" status line
source $HOME/dotfiles/vimrc.statusline

" neobundle
source $HOME/dotfiles/vimrc.bundle

" plugin settings
source $HOME/dotfiles/vimrc.plugins

" unite
source $HOME/dotfiles/vimrc.unite

" colors
source $HOME/dotfiles/vimrc.colors
To find out the existing key bindings, use one of the following ex commands:
:map
:nmap
:imap
:vmap
Shougo/neobundle.vim
NeoBundle is a Vim plugin manager. All I have to do is name the github project name, and it takes care of the rest. This is one of the many Vim plugins written by Shougo who also calls himself the Dark Lord of Vim.
Shougo/unite.vim
The unite.vim plug-in can search and display information from arbitrary sources. Here are some blog posts introducing unite.vim:
- Unite.vim, the Plugin You Didn’t Know You Need
- Replacing All The Things with Unite.vim
- Vim Ctrlp Behaviour With Unite
First my rationale behind loving this lil plugin. Not only is it a powerful interface for navigating my code, but it is a consistant interface. Once I get the muscle memory for navigating one thing (say buffers), I can use that to navigate all the things (say yank history).
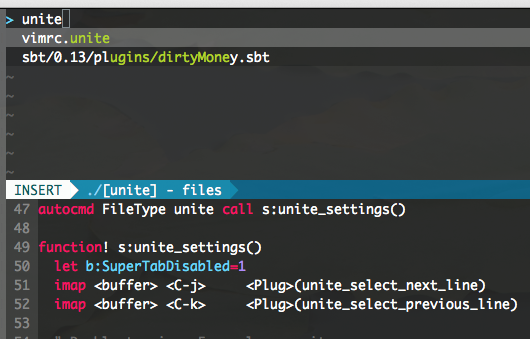
So the first thing I wanted to do using unite.vim was to emulate Ctrl-P functionality in SublimeText. Ctrl-P and Ctrl-N are actually frequently used key bindings for previous and next, so I’m going to define spacebar as the prefix for unite.vim, and use <space>f for files.
" Unite

let g:unite_enable_start_insert = 1
nmap <space> [unite]
nnoremap [unite] <nop>
let g:unite_data_directory = '~/.unite'

call unite#filters#matcher_default#use(['matcher_fuzzy'])
call unite#filters#sorter_default#use(['sorter_rank'])

" File searching using <space>f
nnoremap <silent> [unite]f :<C-u>Unite -no-split -buffer-name=files -profile-name=buffer -auto-preview file_rec/async:!<cr>
Because I’m using -no-split here the list of files will be displayed in the current window. This is considered more Vim, because Vim is a modal editor.
Pressing enter would take the default action, which in this case is opening the file. Pressing tab shows more actions like displaying the file in a split window.
Building on this, we can define some useful commands like grepping using the silver searcher.
if executable('ag')
  let g:unite_source_grep_command='ag'
  let g:unite_source_grep_default_opts='--nocolor --nogroup -S -C4'
  let g:unite_source_grep_recursive_opt=''
elseif executable('ack')
  let g:unite_source_grep_command='ack'
  let g:unite_source_grep_default_opts='--no-heading --no-color -C4'
  let g:unite_source_grep_recursive_opt=''
endif

" Grepping using <space>/
nnoremap <silent> [unite]/ :<C-u>Unite -no-quit -buffer-name=search grep:.<cr>

" Yank history using <space>y
let g:unite_source_history_yank_enable = 1
nnoremap <silent> [unite]y :<C-u>Unite -no-split -buffer-name=yank history/yank:<cr>

" Buffer switching using <space>s
nnoremap <silent> [unite]s :<C-u>Unite -no-split -buffer-name=buffers -quick-match -auto-preview buffer:<cr>

" Buffer and recent using <space>r
nnoremap <silent> [unite]r :<C-u>Unite -no-split -buffer-name=mru -quick-match buffer file_mru:<cr>

" Bookmark using <space>b
nnoremap <silent> [unite]b :<C-u>Unite -no-split -buffer-name=bookmark bookmark:<cr>

" Add bookmark using <space>x
nnoremap <silent> [unite]x :<C-u>UniteBookmarkAdd<cr>

" Everything using <space>a
nnoremap <silent> [unite]a :<C-u>Unite -no-split -buffer-name=files buffer file_mru bookmark file:<cr>

" Help using <space>h
nnoremap <silent> [unite]h :<C-u>Unite -no-split -buffer-name=help help:<cr>

autocmd FileType unite call s:unite_settings()

function! s:unite_settings()
  let b:SuperTabDisabled=1
  imap <buffer> <C-j>     <Plug>(unite_select_next_line)
  imap <buffer> <C-k>     <Plug>(unite_select_previous_line)

  " Double tapping <Esc> closes unite
  nmap <silent> <buffer> <Esc><Esc> <Plug>(unite_exit)
  imap <silent> <buffer> <Esc><Esc> <Plug>(unite_exit)
endfunction
Shougo/neomru.vim
Unite.vim is extensible via other Unite plugins, which are themselves Vim plugins. One of them is neomru.vim for most recently used files.
tsukkee/unite-help
unite-help is an unite source for help files. All of Vim features are documented as helpful text files, and this allows me to look them up using <space>h.
For example, to look up key bindings on window commands, I can type <space>h and on Unite enter :wincmd. This tells me that I can make the current window by wider <C-w>10>.
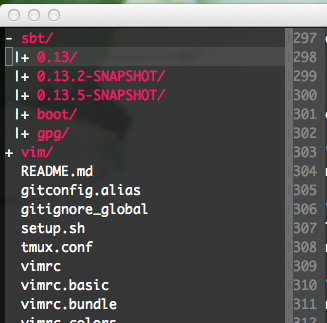
Shougo/vimfiler
Vimfiler is a file explorer. Not sure how much I would need it, but I use SublimeText’s file navigation sidebar enough that I figured I’ll have something similar. Here’s how to display a file explorer in a split window on by typing backslash e:
" vim.filer {{{
if neobundle#is_installed('vimfiler')
" Enable file operation commands.
let g:vimfiler_safe_mode_by_default = 0

let g:vimfiler_as_default_explorer = 1
nnoremap <silent> <Leader>e :<C-U>VimFiler -buffer-name=explorer -split -simple -winwidth=35 -toggle -no-quit<CR>
nnoremap <silent> <Leader>E :<C-U>VimFiler<CR>

" ....
endif
" }}}
Inside the vimfiler:
?displays helpadisplays the list of actionsNcreates a new fileKcreates a new directory
Shougo/neocomplete.vim
neocomplete provides keyword completion system by maintaining a cache of keywords in the current buffer. I also tried YouCompleteMe, but it didn’t work as well.
Shougo/neosnippet.vim
neosnipplet provides snipplet support. It also integrates with neocomplete. The actual snipplet templates are available from neosnippet-snippets.
You can check out what’s in scala.snip:
$ cat ~/.vim/bundle/neosnippet-snippets/neosnippets/scala.snip | less
snippet     match
abbr        match {\n  case .. => ..
      match {
              case ${1} => ${0}
      }
....
Here’s from the keybinding recommended in the README:
" neosnippet {{{
if neobundle#is_installed('neosnippet.vim')
" Plugin key-mappings.
imap <C-k>     <Plug>(neosnippet_expand_or_jump)
smap <C-k>     <Plug>(neosnippet_expand_or_jump)
xmap <C-k>     <Plug>(neosnippet_expand_target)
endif
" }}}
If I open a .scala file, and type match<Ctrl-k> it expands into a match-case.
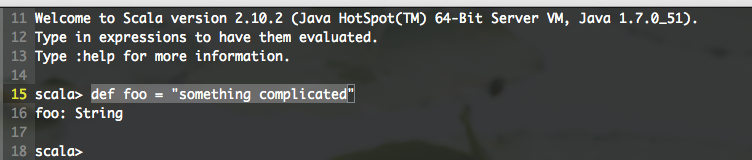
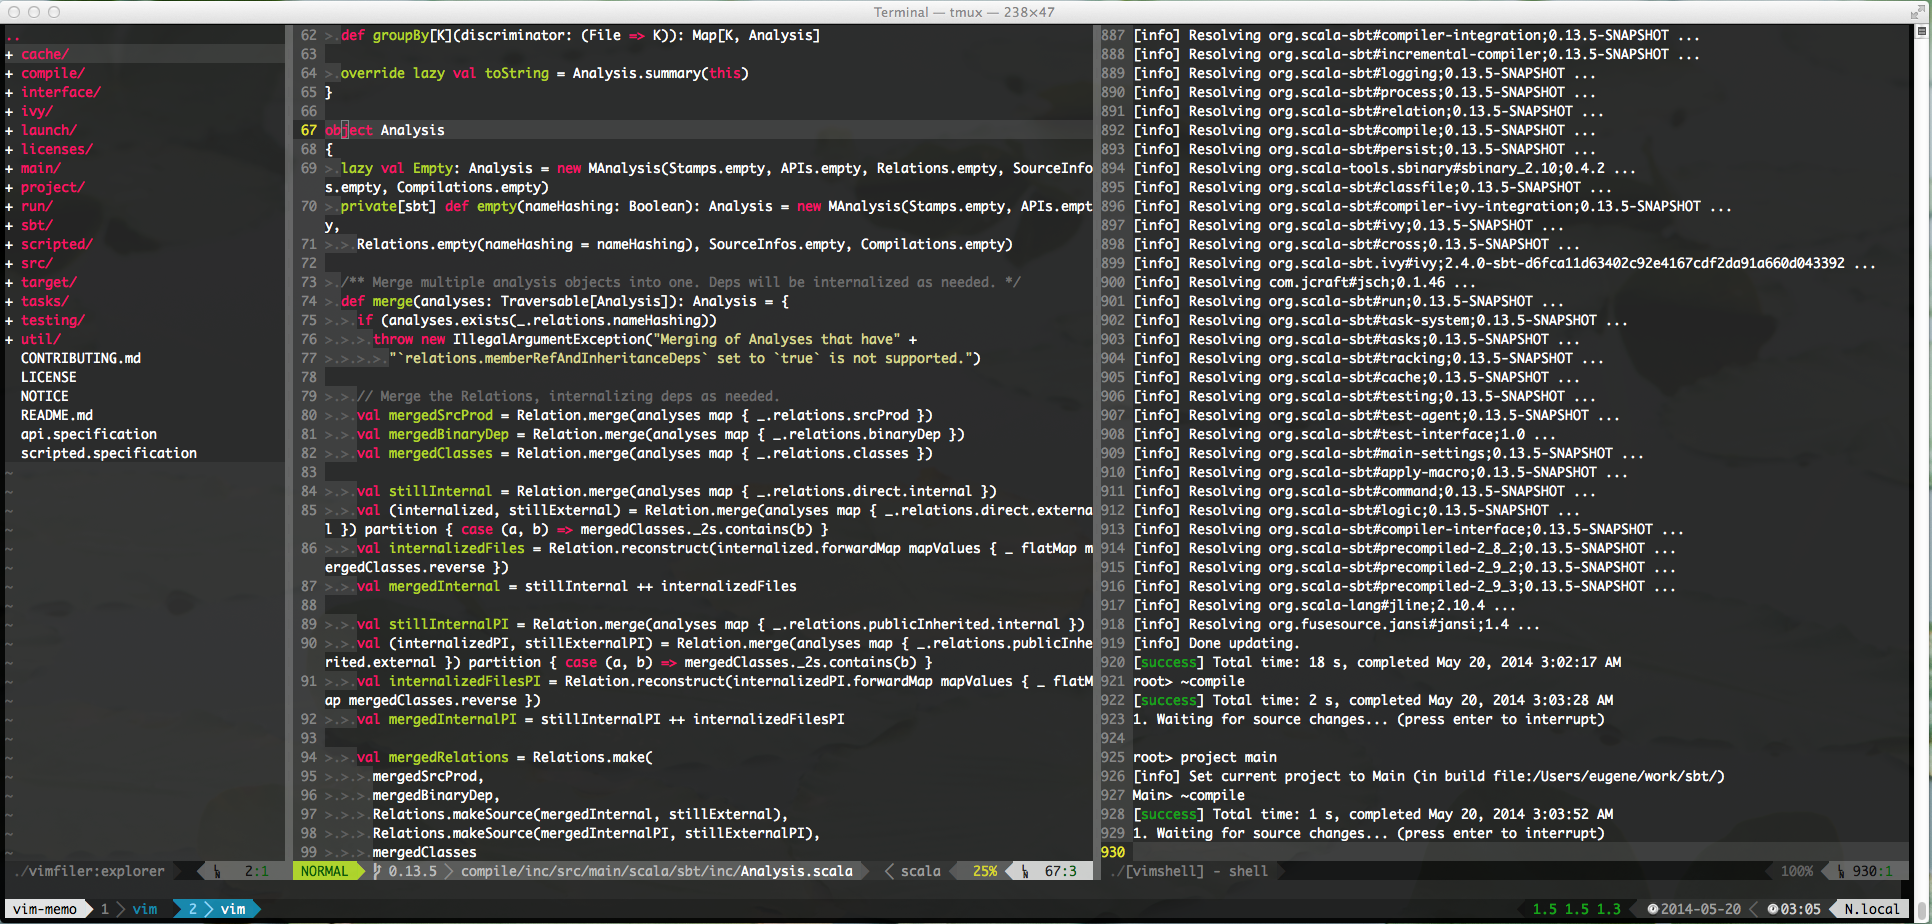
Shougo/vimshell.vim
vimshell is a shell written purely in Vim script. Apparently having a shell running inside the editor can come in handy. For one thing, text can now be yanked back from the REPL without going through some contraption:
Now we can define a keyboard shortcut to start it up quickly.
" vimshell {{{
if neobundle#is_installed('vimshell')
nnoremap <silent> <Leader>s :<C-U>VimShell -buffer-name=shell -split -toggle<CR>
let g:vimshell_user_prompt = 'fnamemodify(getcwd(), ":~")'
endif
" }}}
Similar to file explorer, backslash s will now toggle a shell window. While the integrating shell with Vim could be interesting, it’s really not the same as running Zsh. Also, even for just running sbt, I noticed that up arrow key is bound to something else so history completion of sbt didn’t work.
Shougo/vimproc.vim
vimproc is also required to use vimshell. There’s a manual step required to install this plugin, but it should be taken care of as the following NeoBundle entry:
NeoBundle 'Shougo/vimproc', {
    \ 'build' : {
    \     'windows' : 'make -f make_mingw32.mak',
    \     'cygwin' : 'make -f make_cygwin.mak',
    \     'mac' : 'make -f make_mac.mak',
    \     'unix' : 'make -f make_unix.mak',
      \    },
      \ }
This requires you have GNU make on the path as make.
About arrows
Vimmers often say “don’t use arrows.” This makes sense because you’re basically giving up on using mouse/trackball/touchpad type of device, and you don’t want to be using arrows 1000 times to get around 1000 lines of code. Vim needs to navigate based on other sementics like page, block, or by searching for some keywords.
Having said that, arrows combined with modifiers are pretty convenient way to navigate outside of the text editting context, like switching between windows. We have three navigation that we care about:
- tmux windows
- tmux panes (split window)
- Vim windows (split window)
Configuing the arrows correctly requires some knowledge into all of the layers that we introduced. Here are some of the links that helped me:
- How do I find out what escape sequence my terminal needs to send?
- How to get shift+arrows and ctrl+arrows working in Vim in tmux?
- Where do I find a list of terminal key codes to remap shortcuts in bash?
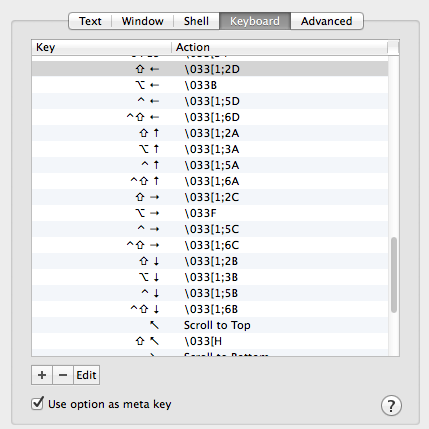
When you hit an arrow key with some modifier, Terminal.app needs to know what sequence of character it needs to send to Zsh. One of the convention is “xterm style”, which is:
<Esc> + "1;" + <modifier key> + ("A" | "B" | "C" | "D")
Where <Esc> is \033, <modifier key> is:
- 2
<Shift> - 3
<Alt> - 4
<Shift-Alt> - 5
<Ctrl> - 6
<Shift-Ctrl> - 7
<Alt-Ctrol> - 8
<Shift-Alt-Ctrl>
and
- A
<Up> - B
<Down> - C
<Right> - D
<Left>
with the exception of <Alt-Left> and <Alt-Right>, which are given <Esc>B and <Esc>F. Not all mappings are present in the default Terminal.app setting, but we can add them manually:
Next, this setting is needed in tmux.conf to forward them into Zsh running inside:
# pass through Shift+Arrow
set-window-option -g xterm-keys on
Now we can also configure tmux window and pane movements:
# control arrow to switch windows
bind -n C-Left  previous-window
bind -n C-Right next-window

# prefix control arrow to move windows
bind -r C-Left swap-window -t -1
bind -r C-Right swap-window -t +1

# use ctrl-shift-arrow keys without prefix key to switch panes
bind -n C-S-Left select-pane -L
bind -n C-S-Right select-pane -R
bind -n C-S-Up select-pane -U
bind -n C-S-Down select-pane -D
To move between the Vim windows, here’s vimrc.moving:
" moving

" Use Shift-arrows to select the active split!
noremap <silent> <S-Up> :wincmd k<CR>
imap <S-Up> <Esc><S-Up>
noremap <silent> <S-Down> :wincmd j<CR>
imap <S-Down> <Esc><S-Down>
noremap <silent> <S-Left> :wincmd h<CR>
imap <S-Left> <Esc><S-Left>
noremap <silent> <S-Right> :wincmd l<CR>
imap <S-Right> <Esc><S-Right>

if &term =~ '^screen'
  " tmux will send xterm-style keys when its xterm-keys option is on
  execute "set <xUp>=\e[1;*A"
  execute "set <xDown>=\e[1;*B"
  execute "set <xRight>=\e[1;*C"
  execute "set <xLeft>=\e[1;*D"
endif
This allows you to move between Vim windows using <Shift>-arrow keys in both Normal and Insert mode. These may be flagged as a newbie keybinds because I’m leaving my hands off the home position, but so far I’m finding them handy.
Ctrl+S to save
Another keybinding that’s newbie-like but I find it useful is Ctrl-S for saving files.
" map <C-s> to :update
noremap <silent> <C-S>      :update<CR>
vnoremap <silent> <C-S>     <C-C>:update<CR>
inoremap <silent> <C-S>     <C-O>:update<CR>
Powerline
Since we’ve put in Powerline for tmux, we’re using it for Vim too. I added this at the end of vimrc.bundle:
set rtp+=$SITE_PACKAGES/powerline/bindings/vim
sickill/vim-monokai
A lot of the experience on SublimeText comes from Monokai. vim-monokai is a port to Vim color scheme.
derekwyatt/vim-scala
For Scala syntax support I’m using Derek Wyatt’s vim-scala. Combined with Monokai, it looks like this:
kana/vim-smartinput
vim-smartinput is a plugin for automatically completing the parens and quotes like SublimeText
tyru/caw.vim
caw.vim aka comment anywhere, is a plugin for commenting out lines of code.
" caw.vim {{{
if neobundle#is_installed('caw.vim')
  nmap <Leader>c <Plug>(caw:I:toggle)
  vmap <Leader>c <Plug>(caw:I:toggle)
endif
" }}}
I’m assigning backslash c to toggle commenting and uncommenting.
MattesGroeger/vim-bookmarks
vim-bookmarks is a plugin for managing bookmarks. It works like visual marks, except you can manage bookmarks by the working directory.
mmtoggles bookmarkmnjumps to the next bookmark in the buffermpjumps to the previous bookmark in the buffer
vim-bookmarks also provides a unite source:
<Space>mlists booksmarks for the working directory
Shougo/unite-session
unite-session is a plugin for managing sessions. A Vim session remembers the buffer list and split windows among other things. You could use the built-in :mksession, but this one is integrated with Unite. To avoid saving Vimfiler buffer I had to write some Vimscript to close plugin buffers on exiting Vim. After some trial and error, I was able to get it to save and load automatically.
summary
This was a personal memo on listing out links and settings. Much of the credit goes to people like yuroyoro and Shougo. I’m not sure how long it would take for me to get comfortable enough to make Vim my main editor, but at least I wrote this post using Vim.