IKEA DIY standing desk
I tried make shift standing desk for about a month by propping up the monitors, keyboard, etc., then decided to make a new desk for just standing and coding.
After I started working from home, the current desk has been taken over by 3 monitors for work machine and my personal laptop, and I wanted to reclaim the work surface for reading and writing.
parts
From IKEA
- 1 Vika Furuskog ($40.00)
- 2 Red Vika Annefors ($40.00 each)
From Home Depot
- 1 Crown Bolt Zinc Plated #6 x 1-1/2" Wood Screws (100) ($5.58)
- 1 “1x12-6” #2 Common Board ($11.62)
- 2 “1x12-4” #2 Common Board ($5.87 each)
- 7 “1x12x10” board custom cut from the above
- 4 “1x12x19” board custom cut from the above
- 1 2 inch Flat Chip Brush ($1.15)
- 1 Minwax 1 qt. Satin Fast-Drying Polyurethane ($10.97)
- 1 Klean-Strip 1 qt. Green Safer Paint Thinner ($4.78)
- 1 West Chester Nitrile-Dipped Large Multi-purpose Gloves 5 Pack ($5.00)
- 1 Workforce 6 Pack Pocket Rags ($2.98)
- 1 3M Tekk Protection Sanding Painted Surfaces Respirator (2-Pack) ($4.97)
- 1 3M Sanding Block ($5.47)
- 1 3M 9 in. x 12 in. 220-Grit Sandpaper (3-Pack) ($3.97)
Total: $187.08 + tax
home depot
Go to Home Depot with the dimensions of IKEA parts printed out. Head to the lumber section and ask someone to cut you 7 pieces of 1x12x10 inch board and 4 pieces of 1x12x19 inch board. Pick out boards without markings.
hacking shelves
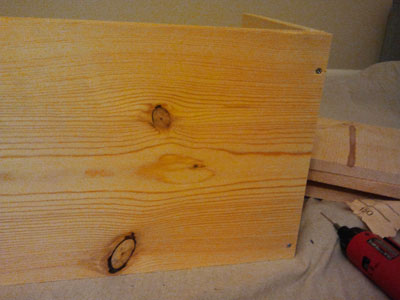
Make 2 shelves by screwing boards together. First, sand all cut ends and edges with fine sand paper. Next, select 2 of nicer long boards for the side panels; the others become the top panels. Next, pick out 3 short boards each for the dividers. Arrange them so that better cut ends face outside, then mark the positions and top side using pensil as “top right,” “top center,” and “top left.”
Pre-drill small holes for the screws to avoid cracking. Screw left and right diviers to the side panel 2cm from the bottom and 4cm from the top. Make sure that the bottom ends are flush.
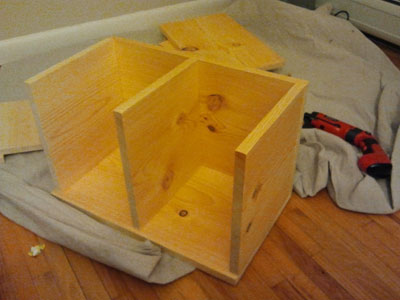
Next, screw the top panel to the side panel, 4cm from both ends. If the dividers are not perpendicular, you might have to unscrew the sides a bit. Then screw the top panel to left and right dividers.
Place the center panel halfway in, and screw it to the side panel. Again, 2cm from the bottom and 4cm from the top. Make sure the bottoms line up, and screw it also from the top panel. The final shelf looks like this, except for the yellow tint my phone keeps adding:
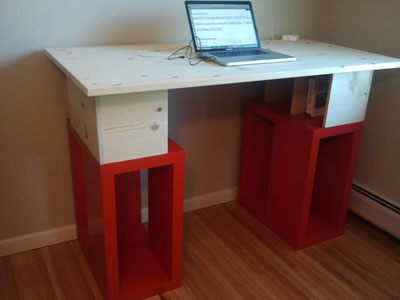
ikea
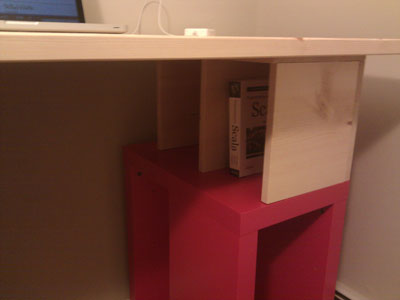
Build 2 Vika Annefors normally. Shelves will eventually go in between the table top and Annefors.
metal rails
To secure the table top to the shelves, remove the metal rails under the table top by unscrewing the screws and gently pry the rails with a flathead scewdriver.
To place the shelves with around 4cm ledge, measure how far the grooves are from each ends. Oddly left and right grooves were not placed symmetrical for mine (22.5cm vs 21cm). Them, subtract 4cm from those measurements. (18.5cm and 17cm) Draw a guide line on the top panel along the long axis 18.5 or 17cm away from the outside, and screw the rails to the shelves. The rails then can be screwed back on to the table top.
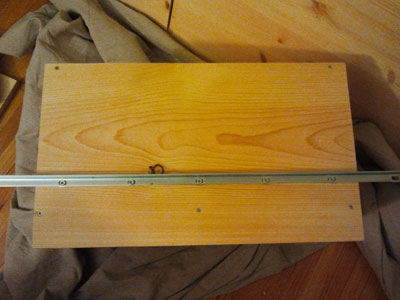
table top
You can get composite material table top Vika Anon for half the price, but this Vika Furuskog is made of solid untreated pine, which I thought was cool. Then I realized the first coffee I spill might make a stain. Here’s how to prevent it.
Sand the table top with 150 grit sand paper until the surface feels smooth like a normal desk. Remove all dust with some paper towels and clean rags.
Apply a thin clear coat of varnish. Make sure strokes overlap. Let it dry in a well-ventilated, but not dusty place for 4 hours or more.
Sand the surface again with 200 grit sand paper, and apply the second thin coat of varnish. Let it dry for 24 hours and polish with a clean rag. Wait another 24 hours for putting on heavy things like monitors.
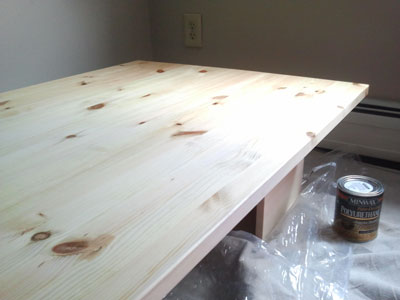
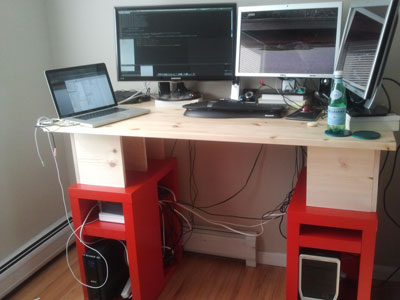
Here’s how it looks now.